How to Divide Blogger Header In Two Parts
 |
| PAKLeet.BlogSpot.Com |
- How To Divide Blogger Header In Two Parts
Today we will likely to show you a solution to split header into two elements. Here you simply need to make many changes with your template and you can done it in only few seconds and then your blog header will be divided in to two elements and left side contain your blog little logo as well as in right side contains your specific widget which can be 468x60 ad banner. So let start the tutorial.
How to Divide Header:
1. Go to your blogger dashboard >> Template >> Edit HTML
2. We will add a new section in the header. To do so, find the following piece of code: (Press Ctrl+f and copy the code in the box that appears)
<a expr:href='data:blog.homepageUrl'><data:title/></a>Once you find the above code, you will see something like this:
<a expr:href='data:blog.homepageUrl'><data:title/></a>Note: The code may be slightly different for different Blogger templates. Don't worry though, move on to the next step.
</b:if>
</b:includable>
</b:widget>
</b:section>
</div>
</div>
3. Paste the following code between </b:section> and </div>
<b:section id='header-right' showaddelement='yes'/>So the final code will look something like this:
<div style='clear: both;'/>
<a expr:href='data:blog.homepageUrl'><data:title/></a>4. We have successfully added a new section. Now we need the widget to appear besides your blog's title (right-oriented). We will achieve this with the help of CSS. Copy the following code and place it before/above ]]></b:skin>
</b:if>
</b:includable>
</b:widget>
</b:section>
<b:section id='header-right' showaddelement='yes'/>
<div style='clear: both;'/>
</div>
</div>
#header, body#layout #header {width:50%;display:inline-block;float:left;}
#header-right, body#layout #header-right {width:35%;display:inline-block;float:right;padding:15px;}
#header-right .widget {margin:0;}
For fine-adjusting of the widget's position, edit the code highlighted in blue. Try with diferent values if you want to change.
5. Hit Save template.
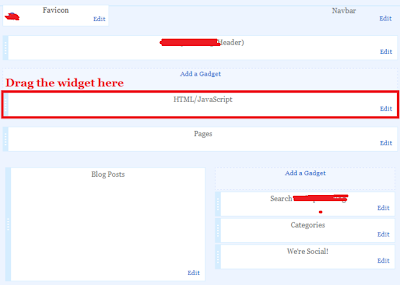
Now Go to Your Blog's Layout Tab and you will watch a HTML/Javascript widget below the header. Edit it and add any code you want to display beside the header. In Layout this Widget appears below header but it shows beside the header as below:
 |
| PAKLeet.BlogSpot.Com |


.png)


No comments:
Post a Comment
Hello Dear,
We hope this post is very useful for you.
If you want any kind help related this post kindly reply.
If You Love Or Like This Post Then Share It With Your Friends.
.
.
.
.
Regards:> internettip Management.