Rooting your android phone/ tablet has
many advantages, where you have complete control over your memory, RAM
and various other aspects important for your necessities. This process
is also cost effective where in you don’t have to buy a new phone only
for more internal memory or RAM, which will enable you to play high end
games and have effective storage, saying goodbye to low memory alerts!
Rooting also brings in few disadvantages which may not be an issue for
most of you. Once you root the android phone, the warranty and services
provided by the company are lost. So, if your phone is spoiled or broken
within the warranty period you cannot claim for it, or you cannot even
ask for a free Software update for your Android device.
 |
| How to Unroot Android And Tablet – Step by Step Guide |
Methods to Unroot Android Phone / Tablet
Method 1: SuperSU App
Step1: Google Play Store The google play store has directly provided you with a free app using which you can unroot your rooted android device. Go to the Google Play Store in your android device and search for SuperSU App in the search box.

Step2: Install SuperSU App Once you have searched for the app, click the install icon. Wait for the installation to complete.

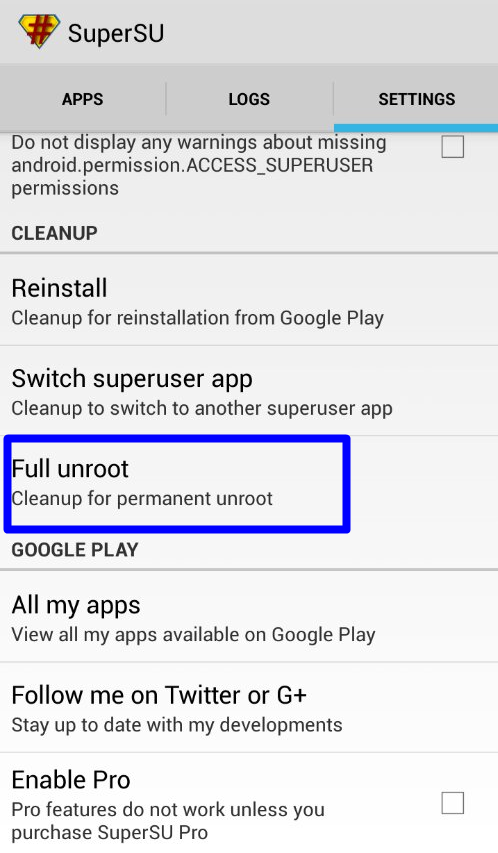
Step3: Choose Full unroot Open the SuperSU app in your android device and go to settings. Select the Full Unroot and wait for some time.
Note: This method will not work for all devices that were rooted without installing custom recovery.

Step4: Restart Once its done, restart your android phone or tablet. It’ll be fully unrooted. You should also uninstall the SuperSU app from your unrooted android device.
Method2: OTA Rootkeeper App
Step1: Google Play Store Simple open the Google Play Store and search for the OTA Rootkeeper App.

Step2: Install OTA Rootkeeper Install the OTA Rootkeeper on to your rooted android device. Wait for the installation to complete.
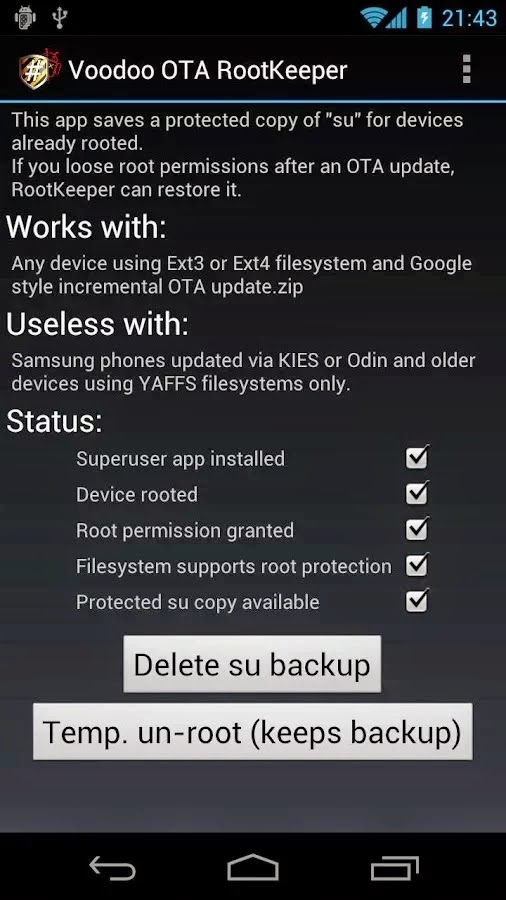
Note: This method is temporary and can be used for purposes such as software updates or repairing your phone.

Step3: Click the Button marked “Temp. unroot (keeps backup) Open the installed app and search for the icon marked Temp. unroot (keeps backup). Click it! That’s it, your android device is temporarily unrooted with backup. Whenever you want to root it back, click the “Restore Root”.

Disclaimer: The above methods have been tested under the observation of experts. We recommend amateurs not to try them on their own. We are not responsible for your unsuccessful outcome using the above procedures. The article is purely for educational purpose.
Some More Android Tricks:


![[Tutorial] How To Skip Time In File Hosting Sites - PAKLeet](https://blogger.googleusercontent.com/img/b/R29vZ2xl/AVvXsEgmm5S5M5hTB_7q76o-RJdhBqTtn8KQhrNKWYti8DaONVheYSoy2RCNVyVG7V19Oh2RPBh5ZpB4mELArfnS_CNLb1RnYMHrbqPFQwK4l92Xfsr-Bs0WmZxRPVvXxHKmITPJDO4d79abBAA/w72-h72-p-k-no-nu/Skip-Time-In-Rapidshare-Filehosting-Files-Tricksuptodate.jpg)

No comments:
Post a Comment
Hello Dear,
We hope this post is very useful for you.
If you want any kind help related this post kindly reply.
If You Love Or Like This Post Then Share It With Your Friends.
.
.
.
.
Regards:> internettip Management.